This blog is no longer being updated. You're looking for Cooking with Charles.

Sunday, April 4, 2010

Burrito Time and Pineapple Upside Down Update

Dearest of Readers,

I made something the other day which didn't turn out so well. I'm not even going to post exactly what I did for fear that you might try to copy me. What I will do is explain to you how to make what I should have made in the first place.

Alex once in a while eats burritos for dinner at school. The homemade kind, where he brings in pieces and puts them together and eats them. They usually look pretty good. How hard could that be to replicate? I know about food, and how to use fire to make it better. I figured I would just throw some things in a pan and end up with burritos.

False.


I ended up with something that is very nutritious but almost completely without taste. I'll run you through it step by step.

Rice is rice, I figured. Well, strictly speaking that's true but it's also completely unhelpful. I like the rice at Chipotle. I think what they do is just take their plain old rice, a sploosh of lime juice, some butter, and some minced cilantro then mix it all together. Probably a non trivial amount of salt too.

As far as beans, I really let my laziness mess me up here. I had some leftover beans from a chili I made a while back. I figured that beans are beans. I threw them into some water, boiled them until really soft, then took a potato masher to them (careful, the amount of water present when you start mashing determines how wet the beans will be). I has some onion, garlic, and jalapeño in there too.

Not good. First of all, I forgot salt. Second, I think that the beans were mostly black eyed peas, which do not belong in burritos. Pinto beans would be the correct choice. And beans are really bland. I used a whole jalapeño and a clove of garlic for about a cup of beans (reconstituted) and could not taste it. They really want to be hammered with flavor.

I had one link of andouille sausage left from a previous recipe so I cut it up small and threw it into a pan with some chicken and potatoes. I threw in another jalapeño as well, with half an onion and another two cloves of garlic. Then I added some salt and a bunch of black pepper. Keep in mind that this ended up being probably four to six servings. There was a bit of flavor here, but not a ton.

But I think that's ok. Chicken doesn't really taste like anything. It seems fine for the chicken to rely on the rest of the burrito for flavor.

You'll also see some tomatoes on the plate. Goodness gracious, these saved the whole meal. They were the most exciting part of the whole burrito. In my next entry I'll talk about homemade salsa, which is really what you'll want to use here. It would have really pulled the burrito together.

Alright, that's probably enough about burritos that don't taste like anything. Now for something a little more exciting.


Rather than make the cake from scratch as last time, I used a boxed mix. There was an appreciable difference, but hey, it's still a cake covered with sugar, butter, and pineapple. I also swapped out the pineapple rings (which are more decorative, and appropriate for parties) for the more practical crushed pineapple. It has to be well drained in order for it to not make the cake soggy.

Conveniently, a can of crushed pineapple, well drained, will provide almost exactly 1.25 cups of juice. That's the same as the amount of water required to make a large boxed cake. It adds a little something extra to the batter. I've also heard that using the juice from the salad cherries is tasty, but I have not tried that yet.

I intended to make it all into cupcakes, but with only one pan it would have been three batches. So I made a dozen pineapple upside down cupcakes and the rest became a happy cake. The cupcakes were better, but also notably more work.

Sunday, March 28, 2010

Photodiary 2: Pineapple Upside Down Cake

Dear reader, this is one I've been excited about for a long time. Not knowing anything about cake, I followed an online recipe exactly. However, I'll discuss some changes I recommend. The online recipe does not specify a bake time; mine took 35 minutes in an 8 inch pan.


The first thing you'll notice is that this is a lot of butter. I couldn't get it all to soak into the brown sugar. I recommend reducing the butter to 3/8 cup and the brown sugar to 2/3 cup. The size of the cake is not enough to justify (or support) all of that.

Additionally, the batter is very runny. It has a hard enough time solidifying while sitting in a pool of butter, so this seemed a little suspect. It did eventually turn out alright, though, and tastes like a cake. Even so I wouldn't hold it against anyone if they wanted to use a premade yellow cake mix. That's what most recipes I found recommend anyway.

Thursday, March 18, 2010

Stir Fry Hot Dish

This recipe is something I came up with a while ago. I used several sources for reference; both the internet and the Concordia Language Villages cookbook were relevant. However, I have never really seen anything properly like this done before. I'm very proud of it.

Ingredients:
3boneless pork chops
0.5 csoy sauce
1.5 cfresh broccoli
1.5 csliced carrots
0.5 cchopped red onion
1 cdrained pineapple tidbits
0.25 cpineapple juice
1 cdry rice
4 clovesminced garlic
1 tspcock sauce
water


Procedure:
Soak the pork chops overnight in half of your soy sauce and half of your garlic, just like Jamie used to do. Sleep, go to work, come home. Preheat the oven to 350F. Brown the outsides of the pork chops. They will bake, so don't worry about cooking them through.


Combine the remaining garlic and soy sauce with hot sauce, pineapple juice, and 1.75 cups water. Put the water mixture and dry rice in the bottom of a 9x13 glass pan. Give it a wiggle to make sure it's about evenly distributed. Add the onions and pineapple. Mix it around a little bit, but generally try to keep the rice on the bottom. Add the carrots and broccoli, mixing a bit more, but still with the intention of keeping the rice the wettest. Place the pork chops on top of the broccoli.


Cover the pan with aluminum foil and bake for about an hour. If it seems a bit soggy at this point, remove the foil and bake for another ten minutes to let some steam out. Makes three sizable servings.


Now, just because I was happy with this doesn't mean there aren't things I would change; there most certainly are. The broccoli was overdone for one. I think it would be appropriate to add the broccoli halfway through baking. It would still get plenty done.

It was also a bit wet. I would decrease the amount of water by 0.25 cups. I think I would replace a further quarter cup of water with pineapple juice (there is no shortage of it in a can of pineapple tidbits). Some could also be added to the pork chop soak. And the amount of hot sauce should be doubled or more. There was really no appreciable heat.

And, while pineapple is a good taste in conjunction with both stir fry and pork chops, having almost as much pineapple as either of the real vegetables was distracting. I think that increasing the amount of pineapple juice would make it acceptable to half the amount of actual pineapple. That way I can snack on more of it as I'm preparing this.

Wednesday, March 17, 2010

Rainbow Jell-O Adventure

This is a recipe taken completely from an online source here. The only changes I made were to the flavors of the Jell-O. The internet is rife with recipes very similar to this one, though some take on a strange twist. It's not uncommon, for example, for the author of the recipe to recommend that you grease the pan (your Jell-O pan) with mayonnaise. Yikes.

Ingredients:
3 boxesJell-O
1 boxGelatine (4 envelopes)
1 canSweetened Condensed Milk (14 oz))
1 tspVanilla
water


Procedure:
The first and most crucial step is the choice of your flavors of Jell-O. The recipe itself places no constraints on the flavors you use (that is, any flavor combination will work), but if you use the same flavor more than once you're boring. I elected to use strawberry, orange, and piña colada. I'm not sure how many times on the piña colada box it used the phrase non-alcoholic, but it was a lot.

Prepare the three batches of Jell-O as directed, using 1/2 cup less cold water than directed for each batch. This ensures that it will set firmly. Let it set in your fridge for the recommended time on the box. Leaving it to set for too long will not cause problems. You can make the Jell-O in anything you want, but I had particular success with pie tins. The smooth thin bottom made of aluminum (an excellent heat conductor) will make your life easier when it comes time to remove the finished product.


Now, from here on you want to make sure you've got time to do it in order and with the correct timing. Otherwise tings can get screwed up.

Mix the vanilla, condensed milk, and 2 cups of water in a saucepan and heat to the point where it steams heavily, stirring frequently. Mix all four packets of gelatine into 1 cup cold water and let stand for about a minute. Combine the milk mixture with the gelatine mixture (which will be pretty spooky looking at this point, since you've got one cup of water trying to contain four cups's worth of gelatine). Allow it to cool, but not to set. This will take at least an hour at room temperature. I don't recommend putting it in the fridge unless you are absolutely certain you won't forget about it. If it sets, you have failed.


Whatever it was that you made your Jell-O in, find something at least a little bit larger and put some hot water in it. Dip the bottom of the pie pan in the warm water for about a quarter minute to loosen the Jell-O from the mold. They suggest this on the box, which made me skeptical, but it actually worked very well. Cut the Jell-O into small pieces, such as rectangles, and invert the pan over a 9x13 glass pan. The procedure is identical for each batch of Jell-O. Rearrange the pieces to be more or less level, as well as pretty.


Once your milk mixture has cooled, pour it over the small pieces of Jell-O. Wiggle it around a little bit to get it to seep into all of the cracks then put it in the fridge. It will start to set appreciably within a half hour, though I went to bed before determining exactly how long it takes to be done.


Once set, the dessert can be loosened by a quick soak in warm water. Then cut it into serving sized pieces and enjoy. Serves approximately one million people. Seriously, this makes a lot. The picture isn't even all of it.
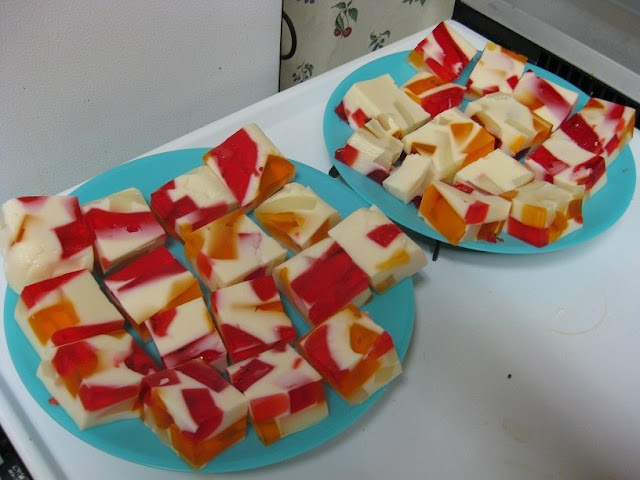


Now, for anyone with a even a passing familiarity with Jell-O, there should be a few variations to this recipe that jump to mind. The first, right there on the box, is fruit (other than pineapple, guava, and other very acidic ones). Fruit would be great in here. The kind of fruit could even be matched to the Jell-O flavors you're using if you're feeling particularly cute.

The second variation is alcohol. You've got the milk Jell-O holding everything together, so what's the big deal if your colored parts are a little runny? If you're feeling particularly cute, match the alcohol to your Jell-O flavor. Throw some rum into the piña colada. Drizzle some vodka into your orange, or some tequila into the lime. What are daquiris made of? Whatever it is, put that in with the strawberry.

If you do this (and I fully intend to sooner or later), it might be appropriate to sort your regions; make a daquiri/piña colada/margarita mexican flag. Bonus points for the Captain and Coke eagle in the middle. That way you don't have to worry about the boozes playing nicely with each other.

Edit: It looks like piña colada is a seasonal flavor of Jell-O, as are margarita and daquiri. You don't even have to improvise I guess.